Latest Release: 6.3.1
Table of Contents
Documents
The following listing gives those documents that are relevant to the MCNP6.3.1 release.
M. E. Rising, J. C. Armstrong, S. R. Bolding, J. S. Bull, A. R. Clark, C. S. Frederick, J. F. Giron, A. S. Grieve, W. Haeck, F. B. Jones, C. J. Josey, J. A. Kulesza, M. A. Lively, S. Swaminarayan, J. E. Sweezy, C. A. Weaver, A. J. Zukaitis. MCNP® Code Version 6.3.1 Release Notes. Los Alamos National Laboratory Tech. Rep. LA-UR-25-23548, Rev. 1. Los Alamos, NM, USA. April 2025.
PDF Cite
J. A. Kulesza, T. R. Adams, J. C. Armstrong, S. R. Bolding, F. B. Brown, J. S. Bull, T. P. Burke, A. R. Clark, R. A. Forster III, J. F. Giron, A. S. Grieve, C. J. Josey, R. L. Martz, G. W. McKinney, E. J. Pearson, M. E. Rising, C. J. Solomon Jr., S. Swaminarayan, T. J. Trahan, C. A. Weaver, S. C. Wilson, A. J. Zukaitis. MCNP® Code Version 6.3.1 Theory & User Manual. Los Alamos National Laboratory Tech. Rep. LA-UR-24-24602, Rev. 1. Los Alamos, NM, USA. May 2024.
PDF Cite
J. S. Bull, C. J. Josey, J. A. Kulesza, M. E. Rising, S. Swaminarayan. MCNP® Code Version 6.3.1 Build Guide. Los Alamos National Laboratory Tech. Rep. LA-UR-25-22869, Rev. 1. Los Alamos, NM, USA. April 2025.
PDF Cite
C. J. Josey, A. R. Clark, J. A. Kulesza, M. A. Lively, E. J. Pearson, M. E. Rising. MCNP® Code Version 6.3.1 Verification & Validation Testing. Los Alamos National Laboratory Tech. Rep. LA-UR-25-22398, Rev. 1. Los Alamos, NM, USA. March 2025.
PDF Cite
C. J. Solomon Jr., C. R. Bates, J. A. Kulesza, M. J. Marcath. The Intrinsic Source Constructor Package: Installation and Use. Los Alamos National Laboratory Tech. Rep. LA-UR-25-23815. Los Alamos, NM, USA. April 2025. ISC Version 3.0.
PDF Cite
C. R. Bates. MCNPs Easy Sources for (α,n) (MESA) 1.0: A User's Guide. Los Alamos National Laboratory Tech. Rep. LA-UR-24-32000. Los Alamos, NM, USA. November 2024.
PDF Cite
C. R. Bates. MCNPs Easy Sources for (α,n) (MESA): Verification with Sources4c. Los Alamos National Laboratory Tech. Rep. LA-UR-24-31721. Los Alamos, NM, USA. October 2024.
PDF Cite
Build Guide Details
To assist with building the MCNP code, this section describes operating system-specific details that will evolve over time (e.g., links to external websites). If details are found out of date, links found broken, etc., please contact the MCNP Team to notify them of the issue so that this webpage can be kept up to date.
The MCNP Development Team recommends using the Intel compilers which are available with the no-cost Intel® oneAPI development tools. These tools have several useful components, but only the C/C++ and Fortran compilers are needed to build MCNP:
- Intel® oneAPI DPC++/C++ Compiler and Intel® C++ Compiler Classic
- Intel® Fortran Compiler Classic and Intel® Fortran Compiler
Both of these compilers are included in the Intel® oneAPI HPC Toolkit. They can also be installed as individual packages.
Linux
The Intel® oneAPI Toolkits Installation Guide for Linux OS, found as a subpage under the Intel® oneAPI HPC Toolkit webpage, provides detailed instructions on how to get and install the Intel® oneAPI packages using different installer modes and package managers. After installation, review the Intel configuration guide for instructions on how to install the required GNU development tools.
Dependencies
| chrpath | The chrpath (binary runpath modification) utility is used during the packaging stage to help bundle the libraries used by the MCNP executables. It can be installed using the distribution's package manager. |
| CMake | CMake can be obtained from the distribution's package manager or directly from the CMake website. |
| Git | The Git Linux download web page has instructions on how to install Git for several distributions. |
| HDF5 | HDF5's development package may be available from the distribution's package manager. The full name of the package varies, but it usually contains the phrase "hdf5-devel". Installation packages can also be downloaded from the Unix HDF5 v 1.12.1 website . |
| Make | Install Make using the distribution's package manager. |
| MPI | Install OpenMPI using the distribution's package manager. For parallel (MPI-enabled) HDF5, also install the HDF5 OpenMPI development package, if available, from the package manager. If a parallel version is not available, it must be built from the HDF5 source code. |
| Python | The distribution's package manager can be used to install Python and individual Python modules. Note that installing the h5py package will install both Python and the numpy package as dependencies. |
| X11 | The X11 development package is usually available from the distribution's package manager and can be found with a search for "libx11-dev" or "libx11-devel". |
Building HDF5
Download the CMake-hdf5-1.12.1.tar.gz file from the HDF5 downloads page,
CMake-based
HDF5 source code, from the HDF Group website. In a terminal, enter the commands:
gunzip CMake-hdf5-1.12.1.tar.gz
tar -xf CMake-hdf5-1.12.1.tar
cd CMake-hdf5=1.12.1
ctest -S HDF5config.cmake,BUILD_GENERATOR=Unix -C Release -VV -O hdf5.log
For parallel HDF5 1.12.1, replace the ctest command line with:
ctest -S HDF5config.cmake,BUILD_GENERATOR=Unix,HPC=ON -C Release -VV -O hdf5-mpi.log
To install HDF5, copy the HDF5-1.12.1-Linux.tar.gz file to the installation directory and enter these commands:
tar -xf HDF5-1.12.1-Linux.tar.gz
export HDF5_DIR="$(pwd)/HDF5-1.12.1-Linux/HDF_Group/HDF5/1.12.1/share/cmake"
macOS
Caution
The following macOS recommended compilers and dependency descriptions are generally tailored to the Apple Intel (x86_64) architecture. Because of the complexities and evolving compiler support related to building on the newer Apple silicon (arm64) architecture, some unsupported build workflows are provided as a courtesy to those needing help getting started. See the Building on Unsupported Machines / Operating Systems section for this information.
The Intel® oneAPI Toolkits Installation Guide for macOS provides detailed instructions on how to get and install the Intel® oneAPI packages using different installer modes and package managers.
Dependencies
There are a variety of package managers available for macOS. The MCNP Development Team typically uses HomeBrew and/or Spack software package manager to provide such capability. As such, when a package manager is referred to in this section, it will refer to such software that provides this type of capability.
| CMake | CMake can be obtained from a third-party package manager or directly from the CMake website. |
| Git | Git is included with the Xcode Command Line Tools. Other macOS download options can be found on the Git macOS downloads web page. |
| HDF5 | HDF5 can be obtained from a third-party package manager. The HDF Group does not provide macOS installers. |
| Make | Make is included with the Xcode Command Line Tools. Make can also be obtained from a third-party package manager. |
| MPI | Install OpenMPI from a third-party package manager. A parallel (MPI-enabled) version of HDF5 may also be available from such package managers, and can be used if that is the case. A parallel version can also be built from the HDF5 source code. |
| Python | Python can be obtained from a third-party package manager or from the Python macOS page. Once installed, the pip command can be used to install the h5py package, which will also install the numpy package. |
| X11 | X11 capability on macOS is provided by the XQuartz package, which includes the X11 development files that are required to build the code. |
Building HDF5
On macOS, the CMake-based version of HDF5 will only build with AppleClang,
which causes problems for parallel HDF5. So, download the hdf5-1.12.1.tar.gz file from the HDF5 downloads page,
Autoconf-based
HDF5 source code, from the HDF5 website. Then enter:
export HDF5_ROOT=<install path>
gunzip hdf5-1.12.1.tar.gz
tar -xf hdf5-1.12.1.tar
cd hdf5-1.12.1
./configure --prefix=$HDF5_ROOT
make -j && make test && make install
For parallel HDF5, replace the configure line with:
CC=mpicc ./configure --enable-parallel --prefix=$HDF5_ROOT
Windows
The Intel® oneAPI Toolkits Installation Guide for Windows, found as a subpage under the Intel® oneAPI HPC Toolkit webpage, provides detailed instructions on how to get and install the Intel® oneAPI packages using different installer modes and package managers. Note that the Intel compilers rely on the Microsoft C/C++ compiler, which are included with the no-cost Build Tools for Visual Studio package as well as Visual Studio.
Caution
As of Visual Studio 2022, version 17.4.0, the Intel C++ Compiler Classic (icl) versions older than 2021.8 will not compile the MCNP code. For these versions of Visual Studio, icl version 2021.8 or higher must be installed. These versions of icl are distributed with the Intel® oneAPI HPC Toolkit version 2023.0 and higher.
Dependencies
| CMake | CMake and the required Ninja build tool are included in Visual Studio and in the freely available Build Tools for Visual Studio package. It can also be downloaded from the CMake website. |
| Git | Git for Windows is available here. |
| HDF5 |
Version 1.12.1 of HDF5 for Windows built with Visual Studio 2019 is available in the hdf5-1.12.1-Std-win10_64-vs16.zip file on the HDF5 downloads page
here.
This package also works with Visual Studio 2022.
|
| MPI | The MCNP installation package includes an option to install Microsoft MPI. It is also available directly from Microsoft at Microsoft MPI. No pre-built parallel (MPI-enabled) HDF5 libraries are available for Windows; such libraries must be built from the HDF5 source code. |
| Python | Python can be installed from the Microsoft Store or from the Python Windows page. Once installed, the pip command can be used to install the h5py package, which will also install the numpy package. |
| X11 | The X11 development libraries required by Windows are included with the MCNP code distribution. |
Creating a Visual Studio Project Solution File Using the Intel CMake Toolset
CMake can also create the MCNP project solution file, mcnp.sln for use with Visual Studio. Note that compiling
the MCNP code with Visual Studio will take longer than using the Ninja build tool.
Open a command prompt and create a new the MCNP build tree folder, build_VS. Go to the new folder and enter the following CMake command,
depending on which version of Visual Studio is used:
Visual Studio 2019
cmake -G "Visual Studio 16 2019" ..\ -T "Intel C++ Compiler 19.2" -DCMAKE_Fortran_FLAGS_INIT=/MP
Visual Studio 2022
cmake -G "Visual Studio 17 2022" ..\ -T "Intel C++ Compiler 19.2" -DCMAKE_Fortran_FLAGS_INIT=/MP
The -DCMAKE_Fortran_FLAGS_INIT=/MP CMake flag tells the Fortran compiler to process the source code in parallel.
To open the MCNP project in Visual Studio, enter the command:
devenv mcnp.sln
Building HDF5
Download the CMake-hdf5-1.12.1.zip file from the HDF5 downloads page,
CMake-based
HDF5 source code, from the HDF Group website. Build instructions depend on the version of Visual Studio used.
Visual Studio 2019
In a command prompt, enter the commands:
chdir <path to extracted folder>
ctest -S HDF5config.cmake,BUILD_GENERATOR=VS201964 -C Release -VV -O hdf5.log
Visual Studio 2022
Unfortunately, the HDF5 CMake build system is not setup to use Visual Studio 2022. To add Visual Studio
2022 to the CMake configuration file, open the file CMake-hdf5-1.12.1/HDF5config.cmake and scroll down to line 164:
164:    set (SITE_COMPILER_VERSION "11")
165:  else ()
166:    message (FATAL_ERROR "Invalid BUILD_GENERATOR must be - Unix, VS2019, VS201964, VS2017, or VS201764, VS2015, VS201564")
Add these lines between lines 164 and 165:
  elseif (BUILD_GENERATOR STREQUAL "VS202264")
    set (CTEST_CMAKE_GENERATOR "Visual Studio 17 2022")
    set (CMAKE_GENERATOR_ARCHITECTURE "x64")
    set (SITE_OS_BITS "64")
    set (SITE_COMPILER_NAME "vs2022")
    set (SITE_COMPILER_VERSION "17")
Next, open a command prompt and enter the commands:
chdir <path to extracted folder>
ctest -S HDF5config.cmake,BUILD_GENERATOR=VS202264 -C Release -VV -O hdf5.log
For either version of Visual Studio, after this process is finished, extract the generated HDF5-1.12.1-win64.zip file to a location of your choice.
To build parallel HDF5, open the file HDF5options.cmake and scroll down to line 80:
79:     set (ADD_BUILD_OPTIONS "${ADD_BUILD_OPTIONS} -DHDF5_BUILD_JAVA:BOOL=OFF")
80:     set (ADD_BUILD_OPTIONS "${ADD_BUILD_OPTIONS} -DHDF5_ENABLE_THREADSAFE:BOOL=OFF")
81:  endif()
Insert this line after line 80:
set (ADD_BUILD_OPTIONS "${ADD_BUILD_OPTIONS} -DMPI_GUESS_LIBRARY_NAME=MSMPI")
This option assures that CMake uses Microsoft MPI to build parallel HDF5
Next, replace the ctest command from above with:
ctest -S HDF5config.cmake,BUILD_GENERATOR=VS201964,MPI=ON -C Release -VV -O hdf5-mpi.log -D LOCAL_SKIP_TEST=ON
or
ctest -S HDF5config.cmake,BUILD_GENERATOR=VS202264,MPI=ON -C Release -VV -O hdf5-mpi.log -D LOCAL_SKIP_TEST=ON
depending on the Visual Studio version.
Tests typically need to be disabled on Windows machines, as some of the parallel tests tend to lock up on hard drives formatted with NTFS. If one is using a true parallel file system, that option can be omitted.
Building on Unsupported Machines / Operating Systems
Caution
Unsupported machine / OS configuration details are provided solely as a convenience. These configurations are not intended for production use without additional verification and validation by the user because they are not tested or supported by the MCNP development team. If problems arise during the use of these unsupported machines / operating systems, it is best to have an open discussion on the MCNP Forum with the entire community of code users and developers to get the most up-to-date information.
Apple Silicon (arm64)
Build Natively on Apple Silicon
There are two ways to build on Apple Silicon: natively with Xcode command line tools using dependencies installed via homebrew or using a Docker container as described here. The homebrew path provides convenience whereas the Docker path provides access to a Fortran capable debugger. Which one you use will depend on your needs as a developer.
All terminal commands presented in this section are intended to be executed within a bash shell and should be compatible with zsh, which is the default shell under macOS.
Prerequisites
To build natively on Apple Silicon you will need to install build systems, compilers, and some packages.
| Xcode | Version 16.2 or later. |
| Homebrew |
It is highly recommended you install homebrew in the default location /opt/homebrew.
Deviating from this location precludes the use of pre-built binaries with homebrew and you will end up building all packages and their dependencies.
Be sure to add /opt/homebew/bin to the path in your preferred shell's startup files.
Version 4.4.25 is the latest version tested.
|
| cmake | Version 3.31.6 is the latest version tested. |
| gmake | Version 4.4.1 is the latest version tested. |
| gcc | Versions 12.4+, 13.3+, and 14.2+ are the latest versions tested. |
| HDF5 | Version 1.14.6 is the latest version tested. |
| mpich | Version 4.3.0 is the latest version tested. |
| XQuartz | Install XQuartz using the distribution here. |
A sample sequence of installation steps is provided here:
sudo mkdir -p /opt/homebrew
sudo chown -R $(whoami) /opt/homebrew
curl -L https://github.com/Homebrew/brew/tarball/master | tar xz --strip 1 -C /opt/homebrew
export PATH=/opt/homebrew/bin:$PATH

brew install cmake
brew install make
brew install gcc@14
brew install hdf5
brew install mpich
where the gcc@14 can be replaced with gcc@13 or gcc@12 depending on your preference of compiler version.
Building with Apple Clang
Building with the Apple Clang compilers is the easiest way to build MCNP on Apple Silicon.
Since this compiler does not support OpenMP it has to be disabled at the command line.
MPI can be enabled by adding -DMPI=ON on the cmake line.
mkdir build_clang
cd build_clang
FC=gfortran-xx CC=clang CXX=clang++ cmake .. -DOpenMP=OFF
gmake -j
Replace gfortran-xx with the specific version of gfortran you wish to use.
If the cmake configure step fails with an error, try adding -DHDF5_USE_STATIC_LIBRARIES=OFF to the cmake line above.
Building with GCC
Building with gcc requires you to specify the compilers as environment variables to cmake.
OpenMP can be enabled by specifying -DOpenMP=ON at the cmake line and MPI can be enabled by adding -DMPI=ON on the cmake line.
The build has been tested with gcc-12.4, gcc-13.3, and gcc-14.2.
mkdir build_gcc
cd build_gcc
FC=gfortran-xx CC=gcc-xx CXX=g++-xx cmake .. -DCMAKE_OSX_SYSROOT=
gmake -j
Replace gfortran-xx, gcc-xx, and g++-xx with the specific version of gfortran/gcc/g++ you wish to use.
If the cmake configure step fails with the error ZLIB::ZLIB not found, try adding -DHDF5_USE_STATIC_LIBRARIES=OFF to the cmake line above.
Build with a Docker Container
Containers are a convenient way to install packages when you lack root access. In this section we provide instructions for building a container using Docker, a commonly available containerization software. Aside from allowing you to install packages without requiring root, the container also provides access to gdb, a debugger that understands Fortran. The lldb debugger that ships with macOS fails to parse Fortran variables. Going the container route provides a convenient way to debug with full access to the memory state using gdb. We also provide ddd, a graphical interface to gdb within the container.
Prerequisites
| Docker Desktop | Download and install Docker Desktop from here. |
| Dockerfile | A sample Dockerfile is provided here. |
Set Preferences in Docker
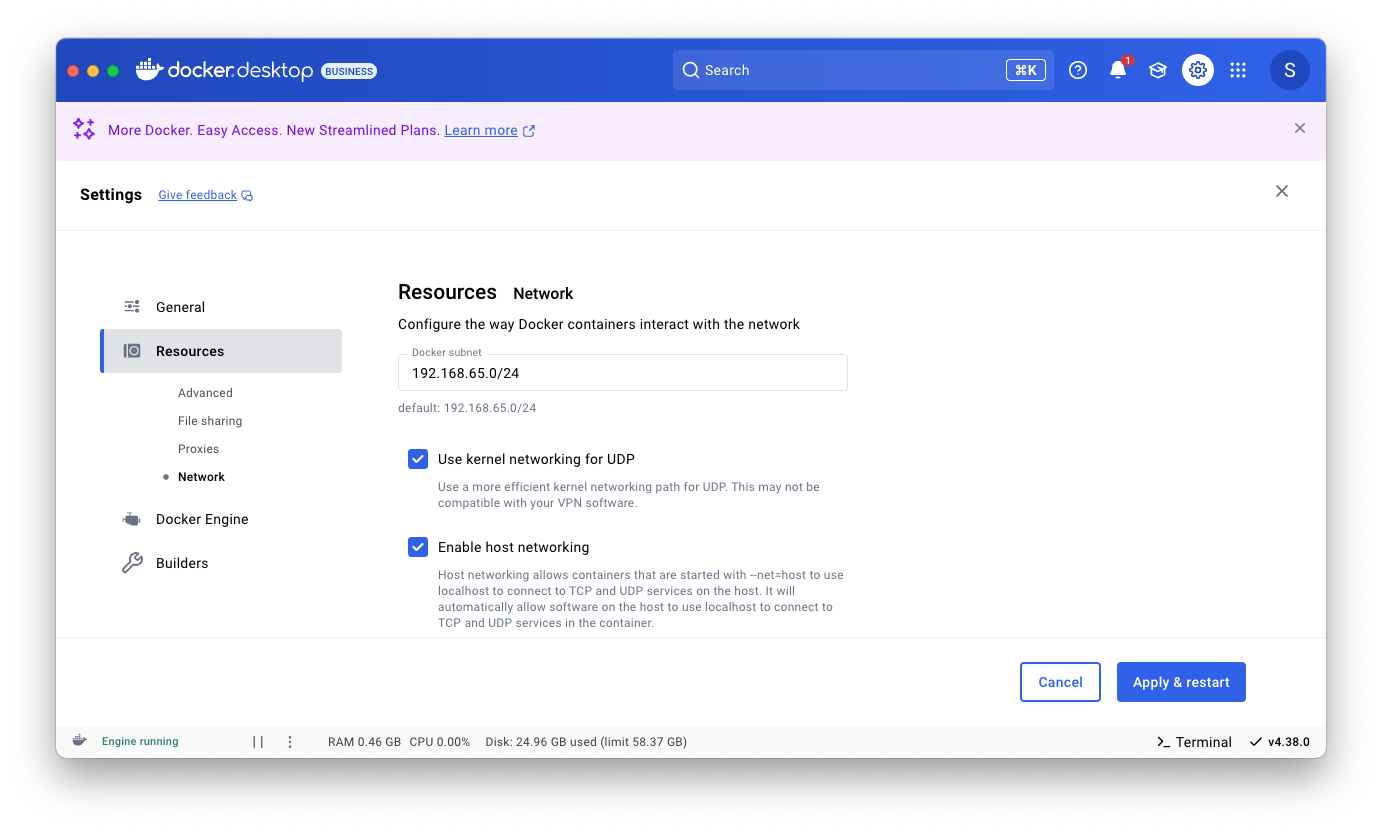
- Open Docker Desktop settings by clicking on the gear icon at the top right of the window
- Click on
Resources - Click on
NetworkunderResources - Ensure that both checkboxes are selected as in Figure 1 and click Apply & restart if changes were made
Set Preferences in XQuartz
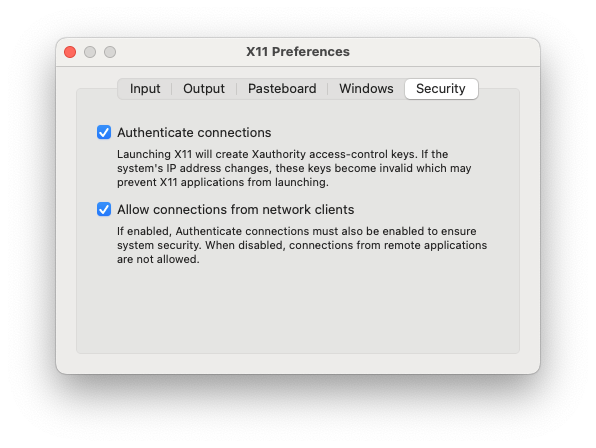
- Open XQuartz settings under the XQuartz menu
- Click on
Security - Ensure that both checkboxes are selected as in Figure 2
Build the Docker Image: One Time
To build an image, you have to first launch the Docker Desktop. Place the listed Dockerfile in a directory with no other files in it. Then execute the following commands in the Terminal application:
cd /path/to/Dockerfile_directory
export USERNAME=$(whoami) UID=$(id -ru)
docker build -f Dockerfile -t bash . --build-arg UID=${UID} --build-arg USERNAME=${USERNAME}
Instantiate the Container: One Time
Depending on whether your MCNP_DATA directory is located within your home directory or not, execute one of the following two steps:
# Container with data directory that exists within your home directory
xhost +localhost
export USERNAME=$(whoami)
docker run --ulimit nofile=65536:65536 -v /Users/${USERNAME}:/Users/${USERNAME} --name mcnp6 -it bash
or
# Container with data directory outside your home directory
xhost +localhost
export USERNAME=$(whoami)
mkdir -p ~/MCNP_DATA
docker run --ulimit nofile=65536:65536 \
           -v /Users/${USERNAME}:/Users/${USERNAME} \
           -v /path/to/MCNP_DATA:/Users/${USERNAME}/MCNP_DATA \
           --name mcnp6 -it bash
This command maps your MCNP_DATA directory into your container.
You have to ensure that /path/on/container exists otherwise the mapping will fail.
Attach and Run: Every Time
Once the container is instantiated, running it is as easy as starting the mcnp6 container and attaching to it from the Terminal as follows:
xhost +localhost; docker start mcnp6; docker attach mcnp6
Starting Over
If you get partway through the steps and need to start over you will have to delete the mcnp6 container and the bash image, in that order, by executing the following in the Terminal:
docker rm mcnp6; docker rmi bash
Troubleshooting
Flaky X11 Connection Between Docker and XQuartz
Unfortunately the X11 connection between XQuartz and the Docker container can be flaky and refuse to display graphics. This problem can be intermittent making it extremely frustrating. If this happens, please try the following:
- Ensure that Docker and XQuartz preferences are set according to the Docker settings and XQuartz settings provided above
- Quit XQuartz and Docker
- Reboot
- Start over using instructions provided above
To test whether the X11 connection is correctly established you can run the xeyes program provided within the container.
Too Many Files Open Error During Build During cmake Step
When building on Docker, the configure step may terminate with an error along the lines of “Too Many Files Open On System”. If this happens, log out of the container, quit the Docker Desktop, and attach to container again.
Dockerfile
Here is the listing of the Dockerfile used to generate the container referenced above. The Dockerfile can be also be downloaded here.
#-*- mode:sh -*-
# A Dockerfile to enable MCNP development
#
# Author: Sriram Swaminarayan
# Date: March 14, 2025
#
# How to in three steps:
#   Build (once) - Initialize (once) - Attach (every time)
#
# 1: Build Image (once):
#   export USERNAME=$(whoami) UID=$(id -u)
#   docker build -t bash . --build-arg UID=${UID} --build-arg USERNAME=${USERNAME}
#
# 2: Instantiate container (once):
#   xhost +localhost
#   export USERNAME=$(whoami)
#   docker run --ulimit nofile=65536:65536 --name mcnp6 -v /Users/${USERNAME}:/Users/${USERNAME} -it bash
#
# 3: Attach to container (every time):
#   xhost +localhost; docker start mcnp6; docker attach mcnp6
#
# -----BEGIN DOCKER BUILD-----
# uses the latest ubuntu image
FROM ubuntu:latest

# Command line arguments
ARG UID
ARG USERNAME

# X11 forwarding to host
ENV DISPLAY="host.docker.internal:0"

CMD ["/bin/bash"]

# Create appropriate user
RUN mkdir -p /Users
RUN useradd -G sudo -s /bin/bash -u ${UID} -d /Users/${USERNAME} ${USERNAME}
RUN passwd -d ${USERNAME}

# Generic dependencies
RUN env
RUN apt-get update && \
    apt-get install -y \
            build-essential \
            cmake \
            cmake-curses-gui \
            ddd \
            emacs \
            g++-13 \
            gcc-13 \
            gdb \
            gfortran-13 \
            git \
            libhdf5-dev \
            make \
            mpich \
            net-tools \
            perl \
            python3 \
            qt6-base-dev \
            sudo \
            util-linux \
            vim \
            x11-apps

# Switch to user and space
USER ${USERNAME}
WORKDIR /Users/${USERNAME}